


An order block in forex trading is a specific price zone on a chart where large institutional players — banks, hedge funds, and other major market participants — placed significant buy or sell orders before price made a strong directional move. Unlike a broad support or resistance zone, an order block points to a precise candle or small cluster of candles, marking the exact footprint left behind by “smart money.” For retail traders trying to understand why price suddenly reverses at certain levels, learning to identify an order block in forex trading is often the first real step into Smart Money Concepts (SMC).
What Is Order Block in Forex Trading, Exactly?
Imagine a large institution needing to buy a substantial volume of a currency pair. Executing the entire order at once could push the price higher and result in a less favorable average entry. Instead, institutions may build positions gradually, absorbing available liquidity from opposite-side orders as price moves.
The candles where this accumulation is believed to occur, shortly before a strong move in the institution’s intended direction, are commonly referred to as an order block in forex trading.
In simple terms, an order block in forex trading is often described as the last candle moving against the trend before a strong impulsive move begins in the opposite direction.
Bullish vs Bearish Order Blocks
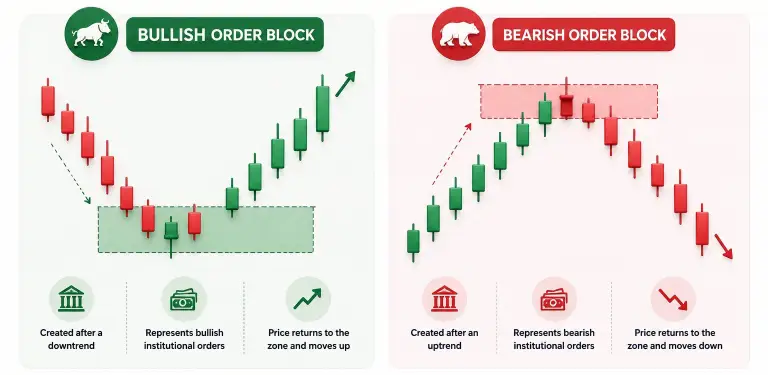
Bullish Order Block
A bullish order block is the last bearish (down) candle before a sharp rally. It shows the zone where buyers, likely institutional, stepped in aggressively enough to flip the momentum from selling to buying.
Bearish Order Block
A bearish order block is the last bullish (up) candle before a strong decline. This zone represents an area where selling pressure eventually overcame buyers and price moved sharply lower.
Price may later return to retest this area, as some orders may not have been fully filled during the initial move. This is why traders often monitor order block in forex trading as potential areas for re-entry or trade setups.
5 Powerful Ways Smart Traders Use Order Blocks
1. Marking Institutional Footprints
Instead of drawing wide, subjective supply-and-demand rectangles, traders mark the precise candle where control shifted from one side of the market to the other. This gives a much tighter, more objective reference point.
2. Confirming with Displacement
A genuine order block in forex trading is usually followed by displacement — a fast, one-sided price move that breaks a recent high or low. Without displacement, the zone is often just noise rather than a real institutional footprint.
3. Using Fair Value Gaps as Confirmation
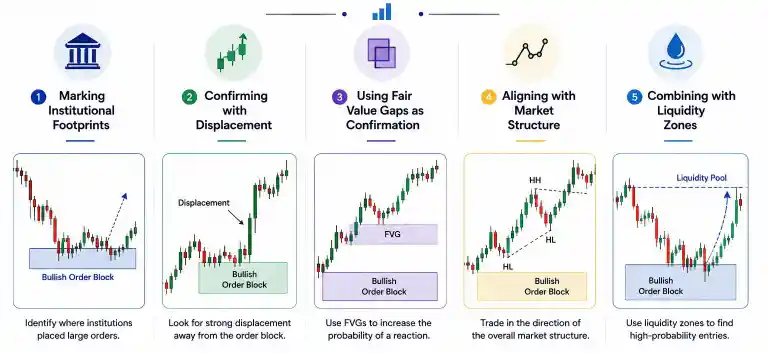
After a valid order block, price frequently leaves behind a small imbalance or gap between candles, known as a fair value gap. When this gap remains unfilled, it adds confidence that the order block is significant rather than random.
4. Aligning with Market Structure
An order block that lines up with the broader trend and recent structure shifts carries far more weight than one found in isolation. Trading an order block against a strong prevailing trend is one of the most common mistakes beginners make.
5. Combining with Liquidity Zones
Institutions typically need liquidity to fill large orders, which is often found just beyond obvious swing highs or lows where retail stop-losses cluster. Order blocks that form near these liquidity pools tend to react more reliably than those that don’t.
How to Identify an Order Block in Forex Trading on Your Chart
- Look for a strong, fast impulsive move (a clear break of structure).
- Trace back to the last opposite-colored candle right before that move began.
- Mark the high and low of that candle as your order block zone.
- Check for a fair value gap immediately after it for added confirmation.
- Wait for price to return to the zone rather than chasing the initial move.
Common Mistakes Beginners Make with Order Blocks
- Marking too many zones: Not every candle before a move is a meaningful order block. Overmarking charts leads to confusing, low-quality signals.
- Ignoring the higher timeframe: An order block on a 1-minute chart means little if it contradicts the structure on the 4-hour or daily chart.
- Trading without confirmation: Entering purely because price touched a zone, without waiting for a reaction or additional confluence, increases the chance of false signals.
- Skipping risk management: Even a textbook-perfect order block can fail. Position sizing and stop-loss placement still matter more than the pattern itself.
Order Blocks vs Support and Resistance: What’s the Difference?
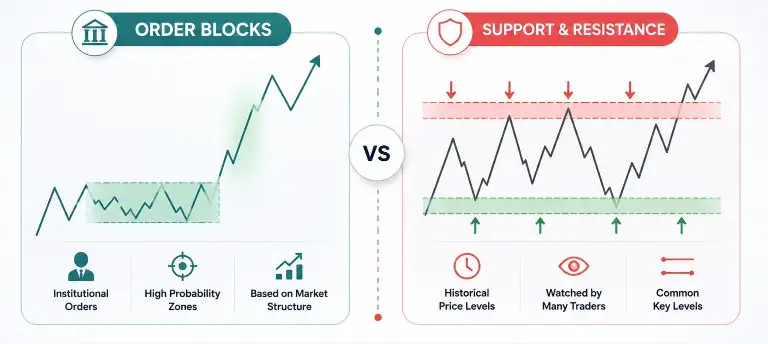
Traditional support and resistance zones are often broad and subjective, based on multiple price reactions across a chart. An order block in forex trading is generally considered a more specific price area associated with the candle or zone preceding a strong market move, rather than simply an area where price has reacted several times. This narrower structure can help traders define more precise entry and stop-loss levels compared with wider horizontal support and resistance zones.
Where Order Blocks Fit into the Bigger Picture
Order blocks rarely work well in isolation — they are one piece of a larger framework. Understanding overall market structure, trend direction, and swing points first makes order block analysis far more reliable. If you haven’t yet, it’s worth reading our detailed guide on market structure in forex trading before applying order block concepts, since structure is what gives an order block its context and validity.
Final Thoughts
An order block in forex trading is a genuinely useful concept for understanding where large institutional players have previously entered the market, but it’s not a guaranteed reversal signal. Price doesn’t always respect a zone perfectly, and false order blocks do happen — which is exactly why combining them with market structure, liquidity analysis, and disciplined risk management matters more than memorizing the pattern alone. Traders who treat order blocks as one tool among several, rather than a standalone strategy, tend to build a far more consistent approach over time.

